
Previous article
Async request processing in Spring MVC - Part 1

Async request processing in Spring MVC - Part 1
Nowadays plenty of Java web applications are built upon the Spring Web Model-View-Controller (MVC) framework. Using it in a synchronous manner is usually quite straightforward: a controller method is invoked with some parameters from the HTTP request, it does its processing and once it's done the response body is returned and Spring MVC takes care of sending the data to the client.
Now this story is slightly different when returning certain data types like DeferredResult or Flux from your controller. Instead of immediately returning the response body of a request, your request handler can do this at a later point in time. In this blog post we'll investigate how this works internally to have a deeper understanding of the framework we use on a daily basis and figure out the advantages.
The Servlet Stack
The central component of Spring MVC is the Dispatcher Servlet. It is responsible for handling all incoming HTTP requests and forwarding them to the appropriate controller.

It implements the Jakarta Servlet Specificationand thus can be used in combination with any servlet container that supports a compatible version of the specification. We'll have a deeper look at what happens inside when a request actually reaches the Dispatcher Servlet as this is important for understanding the complete picture.
Servlet Container
In our example, Spring MVC is used in combination with embedded tomcat as its servlet container. Typically servlet containers provide a built-in Web Server and tomcat is no exception to that.
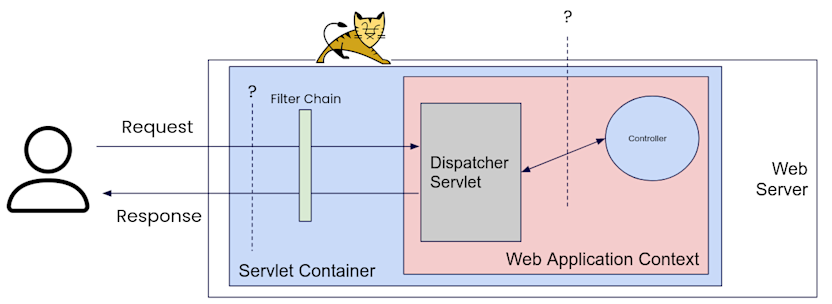
The servlet container
routes HTTP requests to the Dispatcher Servlet
handles the concurrent execution of multiple requests
does pre- and post processing of each HTTP request via filters
Of course there are many more functionalities but these three are the ones we care about for now.
Building our own Servlet
Note that for simplicity we will only look into the functionality of RESTful services which return JSON objects - we will ignore the model/view part of Spring MVC.
I usually like to write code in order to better understand a concept and make things less abstract. So let's just simply create our own servlet! All we need is an embedded tomcat dependency.
   org.apache.tomcat.embed
   tomcat-embed-core
To get things started we'll create a tomcat instance, set it to port 7777 and create the default connector (more on that later - essentially it handles HTTP-protocol related stuff)
    Tomcat tomcat = new Tomcat();
tomcat.setPort(7777);
tomcat.getConnector(); // adds a default connector
Next up we'll implement the Jakarta Servlet Spec (by extending the abstract HTTP version of it)
    public class MyServlet extends HttpServlet {

   @Override
    protected void doGet(HttpServletRequest request, HttpServletResponse response) throws IOException {
        if (request.getPathInfo().equals("/")) {
            response.setStatus(200);
            response.setContentType("application/json");
            response.getWriter().print("{ \"message\": \"You did it!\" }");
        } else {
            response.setStatus(404);
        }
    }
}
For now we'll only implement the doGet method the abstract base class (of course there is one for every HTTP verb). This allows us to handle GET requests and return a response! In this case we set the content type of the response to application/json and write our json content to the output stream for all requests that go to the base path. For all other requests we'll just return a 404 without any content. That's it!
By checking request.getPathInfo() we could compare this against all annotated controller request handlers, invoke the matching one and have a similar functionality to what Spring provides. But that would go too far for our small demo.
Let's wire the servlet into the servlet container!
    // args: context path, doc base path
Context ctx = tomcat.addContext("", null);
First we create a servlet context in which you can provide a context-path that specifies which base path is routed to your servlet. If we just leave it empty like above any request going to http://localhost:7777/... will go to our dummy servlet.
After having specified the context we just add the servlet and provide the url pattern which should be routed to it. Similar to the Dispatcher Servlet of Spring, we'll handle all incoming requests at a central point:
    Wrapper servlet = Tomcat.addServlet(ctx, "myServlet", new MyServlet());
servlet.addMapping("/*");
With the above code we already have a working setup to make our first HTTP GET request. But first, let's add a filter to our setup to have this core concept covered as well. The most prominent use-cases for filters are usually authentication and compression but there are of course many more applications.
    public class MyFilter extends HttpFilter {

   @Override
   public void doFilter(HttpServletRequest request, HttpServletResponse response, FilterChain chain) throws IOException, ServletException {
       if (request.getHeader("my-auth") != null) {
           chain.doFilter(request, response);
       } else {
           response.setStatus(403);
           response.getOutputStream().print("You shall not pass");
       }
   }
}
Similar to the servlet, we extend the Jakarta HttpFilter abstract class and implement the doFilter method. In this method we have the http request and response at our hand for manipulation.
A third argument, the filter chain is passed as well. We have to invoke it to continue the request processing if our filter determines that everything is in order. Essentially you can register a bunch of filters in your servlet container and all need to be invoked before your request reaches the servlet. This means every filter has the power to completely stop the processing of a request simply by not further invoking the filter chain.
In our example we have a very secure authentication process in place, it simply checks if the "my-auth" header is set and if so it proceeds with the processing of the request. If it's not set we won't invoke the filter chain but instead set the status code to 403, add a famous movie quote and return the response to the client.
Now let's add the filter to your servlet container as well!
    FilterDef filterDefinition = new FilterDef();
filterDefinition.setFilterName(MyFilter.class.getSimpleName());
filterDefinition.setFilterClass(MyFilter.class.getName());
ctx.addFilterDef(filterDefinition);

FilterMap filterMapping = new FilterMap();
filterMapping.setFilterName(MyFilter.class.getSimpleName());
filterMapping.addURLPattern("/*");
ctx.addFilterMap(filterMapping);
This is quite verbose but essentially we create a filter definition where we specify the class we just created, specify the path (in our case everything) on which the filter is applied and add the mapping to the context.
Finally, let's get this thing started! If we put our above tomcat configuration in a main method and start the tomcat server we can send our first requests!
tomcat.start();
As expected if we don't specify our authentication header the filter will block our request:
    curl --location 'http://localhost:7777/'
You shall not pass
But if we do add the header we get to our servlet!
    curl --location 'http://localhost:7777/' --header 'my-auth: trust me'
{ "message": "You did it!" }
A HTTP request reaching your servlet
We managed to launch a successful request to our simple servlet implementation. But what happens before our filters and the servlet is invoked? Here's a high-level overview.
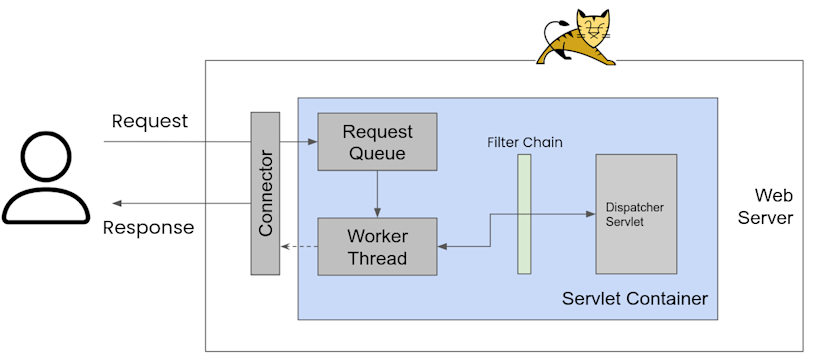
Connector: The connector deals with everything related to the HTTP protocol for newly accepted connections and manages them throughout their lifetime. It identifies the servlet container to forward the request and processes its response. The connector enables Tomcat to act as a standalone web server.
Servlet Container: Once the request is forwarded to a matching servlet container it is put into a request queue waiting to be picked up by a worker thread. If currently all worker threads are busy the queue will fill up.
Worker Thread: Once a request is picked by a worker thread it will start processing by going through the filter chain which finally ends up calling your servlet.
Every http request reaching your Spring controller gets assigned a worker thread from a flexible but bounded worker-thread-pool of Tomcat.
Now what would happen if a lot of your HTTP requests issue long-running database requests or are simply waiting for some form of I/O? Each of them would block a worker-thread until your controller's request method returns. In the worst case these kinds of requests would completely use up all available worker threads blocking new requests or even rejecting them if the request queue runs full even though your application barely does any actual work.
The usual quick-fix for this issue is increasing the amount of threads of the worker thread-pool to be able to handle more requests. However, if you want to avoid the overhead of creating tons of threads you could leverage the asynchronous processing mechanisms that Spring MVC provides out of the box!
To be continued in Part 2!

More blog posts on Celonis Engineering Blog
